Wednesday 30 March 2016

Switching Mains Loads with Relays

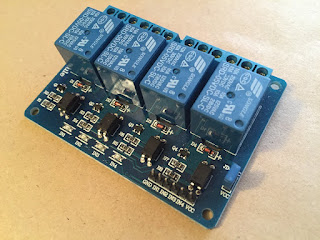
I want to control the external lights around my home from a small computer to provide a bit of automation. The plan is to use an Arduino, and have it switch the lights on and off via relays. There are plenty of low cost relay boards to choose from. Most seem to be clones of the same basic designs which offer either 2, 4 or 8 relays. Here's a typical 4 way board:

4 Way Relay Board
4 Way Relay Board
This board has a 2.54mm pitch pin header with 6 pins - ground, +5VDC power and 4 inputs that control the coils of the 4 relays. Each relay is provided with an individual 3 way screw terminal block that is wired to its common, normally open and normally closed contacts. Note that these terminals are big enough for 1-1.5mm solid wire and the relays are rated for up to 10 Amps. My advice is to stay way below this.

The inputs are protected from the "heavy lifting" of energising the relay coils by opto-isolators. Grounding an input pin allows current to flow from the +5VDC supply through a current limiting resistor, a surface mount red LED, and then the LED within the opto-isolator. The forward current is about 2mA in this situation so it's fine to directly connect these inputs to digital I/Os on an Arduino. The relay coils are wired to the +5VDC supply and the opto-isolator phototransistor collectors, and each is provided with a usual flyback diode. (Note that the +5VDC supply might get in the way of using one of these boards with a Raspberry Pi; these use 3.3V digital I/Os and could be damaged by higher voltages.)

So far I've built a box with an 8 way relay board and connected it to 8 external lamps. A small AC-DC module provides +5VDC locally; I will locate the control system elsewhere, with the link to the relay box containing just relay control lines and ground in a multi-core cable.
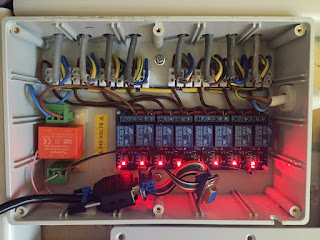
8 Way Relay Board - Driving Lights
Working on electrical installations can be dangerous and is heavily regulated by law. Consult a qualified electrician!

Tuesday 15 March 2016

12 Volt DC PIRs for Outdoor Use

I've wanted to automate the operation of some external lights in my home for a long time, and PIR motion sensors are a must. I already have several as part of an intruder alarm system, but they are not rated for outdoor use; electronics that is typically uses components with wider than normal operating temperatures (e.g. -40 to +85 degrees Celsius instead of 0 to +70), and conformal coating is often used to protect circuitry from moisture (condensation).

When I first looked for external PIRs (several years ago), I found that almost every one of them was designed to be powered by the mains, and to switch a mains load (a lamp). But I need to drive the inputs of a microprocessor based control system from the PIR, so I would prefer a contact closure (volt free) output. I did find one or two low voltage DC units, but they were horrendously expensive (nearly 100 GBP).

A more recent search turned up a much more reasonable solution:

12V DC Outdoor PIR Motion Sensor

This unit retails for under 25 GBP from Solar and Wind Power Systems. It is IP44 rated, runs from a 12 Volt (AC or DC) power supply and has a relay that can switch up to 10 Amps. It allows adjustments to on-time, range (sensitivity) and ambient light.

Note that the unit is supplied with a 4 way terminal block that is quite large (appropriate for 10 Amps). I swapped this for a smaller one. Also, the knock-outs molded into the ABS plastic housing are quite difficult to remove - I resorted to drilling them out.

Here's a video of a quick test of one. In this setup, the ambient light adjustment is at maximum (to allow daylight operation), the range/sensitivity is low, and the on-time is at a minimum - corresponding to about 5 seconds. The power supply is 12VDC, and the output is wired to ground the cathode of a blue LED - the anode is wired to 12V via a 470R resistor.


Notice that the unit's output remains on while the PIR is detecting motion, and stays on afterwards for 5 seconds.

I checked the range quickly in this setup, and detection worked reliably at 4 meters in daylight.

Wednesday 9 March 2016

Arduino 16x2 LCD/Keypad Shield

Many embedded projects benefit from a user interface, and shields with a 16x2 LCD and a 5 button keypad are popular with Arduino users. Most are almost exactly like this one. As with many Arduino peripherals, they are very inexpensive - less than 6 GBP at the time of writing for the one I chose with first class postage within the UK, less still if you can wait for one from China.

Arduino LCD/keypad Shield
Boards such as this are often referred to as "1602A" type, with various manufacturers adding various prefixes and suffixes. They all seem to be based on the Hitachi HD44780 LCD controller (or a compatible clone). And most seem to use a 4-bit parallel interface to this controller (which can also support 8-bit operation). The keypad buttons are wired with a resistor ladder between the power rails so that a unique voltage corresponding to each button is delivered into one of the MCU's ADC inputs.

There are various examples and drivers available for 1602A display/keypad boards running on the Arduino, but I wanted to understand it from first principles, so I coded my own simple driver in C after studying the controller datasheet and the board schematic. This allows you to clear and write strings to the display, and read debounced key presses. I wrote a quick demo program in C using Atmel Studio 7 for this which you can download here.

Note that the documentation is not reliable when it comes to the character set burned into the controller's ROM. The upper 128 character codes in my module did not match the data sheet, so - for example - I had to create a user defined character to get a "degree" symbol for the temperature reading shown in the above picture.

Here's a video showing the demo program running:


LED Brightness Control from an Arduino with PWM

I wanted to be able to control the brightness of an LED backlight in some pushbuttons. The AVR microcontroller on an Arduino has hardware timers with a Pulse Width Modulation (PWM) feature that allows you to send a regular stream of pulses out of a pin with control of the ratio of on time to off time (the mark/space ratio). This is a well established way of controlling LED brightness.

After setting up the AVR timer correctly, you write a value to its output comparison register (OCR) to control the mark/space ratio. A minor catch is that the ratio can be varied between 1:255 and 256:0 (for the 8-bit case) so the output can be fully on, but not quite fully off - indeed you see a perceptible but faint glow from the LED when the OCR is written with zero. My fix to this was to adjust things so the mark/space ratio can be varied between 0:256 and 255:1; the fact that "fully on" is no longer quite possible is imperceptible. This is accomplished by writing the brightness level minus one to the OCR, and treating zero as a special case - by turning off the output pin (via its Data Direction Register), relying on an external pulldown to keep the pin low.

I built a very simple driver circuit on a breadboard with a 2N7000 MOSFET; the Arduino drives its gate, which is pulled down with a 10k resistor. The source is grounded and the drain connects to the LED cathode. The LED anode connects to +12VDC via a 470R resistor which sets the forward current at about 20mA (the forward voltage is about 3V).

I wrote a quick test in C using Atmel Studio 7 - you can download it from here. And here's a video of the result, showing a fade up, a fade down, a sharp on transition, and a sharp off transition:


The fading effect looks much better to me.

Tuesday 8 March 2016

Arduino Real Time Clock

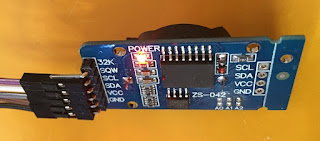
I needed an accurate real time clock for an Arduino based home automation project; many are I2C controlled and based on Maxim's DS3231 which is achieves an accuracy of about 1 minute per year (2ppm) through temperature compensation - a potentially useful side effect of this is that the part provides a temperature reading. Most boards also include an I2C EEPROM. I found a seller on eBay offering 3 units for under 5 GBP, including next day postage:

Real Time Clock and EEPROM board

The board provides a header with 6 pins:
  • GND - ground
  • VCC - power (3.3V or 5V)
  • SCL - I2C clock
  • SDA - I2C data
  • SQW - programmable interrupt/square wave output
  • 32K - free running 32kHz clock output
There's a holder for a CR2032 coin cell on the reverse, to provide battery backup. Note that these are typically not included with the boards (there are international restrictions on shipping lithium batteries).

I hooked it up to my Arduino Mega 2560 with male-female flying leads: I wired GND and VCC to GND and 5V on the power header, SCL and SDA to their counterparts on the communication header, and the SQW output to the INT3 input.

I then wrote a quick program in to test the board (I prefer to code in C using Atmel's Studio for AVR microcontroller development, for more on this see here.) This used the nice, stable and simple I2C master driver written by Peter Fleury. Note that I ignored the board's EEPROM.

The program prints the current time, day, date and temperature once a second:

       
RTC test
time: 12:14.44   day: TUE   date: 08/03/2016   temperature: +24.00
time: 12:14.45   day: TUE   date: 08/03/2016   temperature: +24.00
time: 12:14.46   day: TUE   date: 08/03/2016   temperature: +24.00


The program uses the Arduino's USB serial port for console I/O, based on Mika Tuupola's recipe here. I use TeraTerm on a desktop Windows PC for this, connected to the Arduino's COM port at 115200 baud.

You can download a ZIP of the Atmel Studio 7 project from here.