A new lightweight version of Raspbian Jessie has been released. It looks promising for “headless” applications (no monitor, keyboard or mouse). I fired it up on my Raspberry Pi Model B.
You can get Raspbian Jessie Lite from
here. At the time of writing, the version was dated 2016-02-09 and the kernel version was 4.1. The ZIP download weighed in at 365MB. This contained a similarly sized compressed IMG file. Next, I had to write this image to SD card.
Note that choosing a reliable SD card is something of a science, with guidance available from various sources. For example, see
here. I chose an 8GByte Lexar micro SD card that came bundled with an SD card adapter. I bought it from Amazon because of their no-fuss returns policy:
 |
| Lexas 8GB microSDHC card with SD adapter |
The procedure for writing to image to SD cards can be found
here. I followed the Windows recipe, first extracting the IMG from the ZIP, and then running
Win32DiskImager to write the IMG to my SD card:
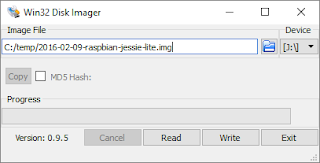 |
| Win32DiskImager application |
It took a few minutes to get these steps done. I then inserted the freshly written SD card in the Pi, connected it to the HDMI input of my monitor, and plugged in an ethernet cable. Boot messages appeared on the monitor within a couple of seconds of power on. The login prompt appeared after maybe 20-30 seconds:
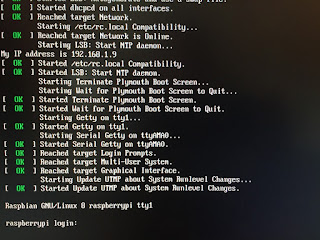 |
| First Boot |
I then switched my monitor back to displaying the output from my desktop PC, aiming to use an ssh client to interact with the now fully headless Pi. There are
plenty to choose from; my favourite is
PuTTY.
To make life easier on my LAN, I use static IP addresses for various devices, such as my NAS, and including my Raspberry Pi. To do this, I reserve an address in my
DHCP server’s configuration, linking the device's
MAC address to a fixed
IP address. For the Pi I chose 192.168.1.9, as shown on the PuTTY configuration dialog:
 |
| PuTTY Launch Window |
After double-clicking the raspberrypi entry (to Open it), I blew past the ensuing security warning by clicking Yes. A terminal window then appeared, and I was then able to log in with the usual default credentials (username = pi, password = raspberry):
 |
| PuTTY Terminal Window |
Many images assume a 2GB SD card and size things accordingly, meaning wasted space on larger cards. I checked, and this was indeed the case:
pi@raspberrypi:~ $ df -h
Filesystem      Size  Used Avail Use% Mounted on
/dev/root       1.3G  912M  281M  77% /
devtmpfs        214M     0  214M   0% /dev
tmpfs           218M     0  218M   0% /dev/shm
tmpfs           218M  4.4M  214M   3% /run
tmpfs           5.0M  4.0K  5.0M   1% /run/lock
tmpfs           218M     0  218M   0% /sys/fs/cgroup
/dev/mmcblk0p1   60M   20M   41M  34% /boot
raspi-config can be used to fix this:
pi@raspberrypi:~ $ sudo raspi-config
You simply highlight option 1 and hit Enter...
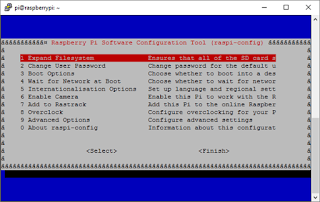 |
| raspi-config in action |
...and a few seconds later you can reboot and the job is done. I did this, and checked the outcome:
pi@raspberrypi:~ $ df -h
Filesystem      Size  Used Avail Use% Mounted on
/dev/root       7.3G  913M  6.1G  13% /
devtmpfs        214M     0  214M   0% /dev
tmpfs           218M     0  218M   0% /dev/shm
tmpfs           218M  4.4M  214M   3% /run
tmpfs           5.0M  4.0K  5.0M   1% /run/lock
tmpfs           218M     0  218M   0% /sys/fs/cgroup
/dev/mmcblk0p1   60M   20M   41M  34% /boot
Notice that /dev/root now has 6.1G available.
I will be trying to use the resulting setup for a few embedded projects.


