My AVR experience is based on various editions of Atmel's Studio IDE - so I wanted to find out how to use it with the Arduino hardware, ignoring the Arduino software as much as possible.
Here are the steps I followed to run a simple C program. My starting point was a fresh install of Atmel Studio (version 7.0.783) and the Arduino software (version 1.6.7) on a desktop PC running Windows 10 - and (of course) an Arduino Mega 2560 connected to the PC via USB, with it's green power LED on.
(Note that you can click on an image to see a full size / full resolution version.)
- on the Start Page, select New Project...
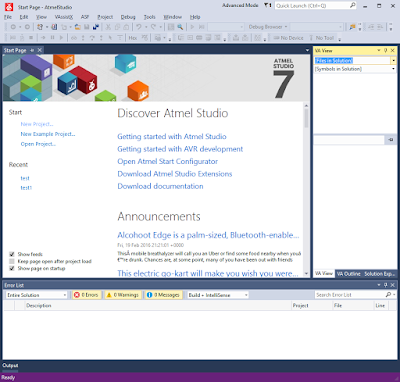
Atmel Studio 7 - Start Page - in the New Project dialog, select GCC C Executable Project, specify a Name and a Location then click OK

Atmel Studio 7 - New Project dialog - in the Device Selection dialog, select ATmega2560 (the type of AVR microcontroller used on the Arduino board) then click OK
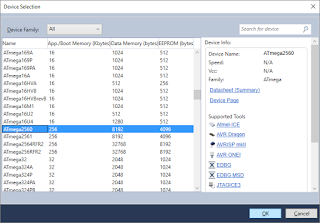
Atmel Studio 7 - Device Selection dialog - a minimal, template project is created, ready for you to enter code...

Atmel Studio 7 - Virgin Project - choose test Properties (assuming your project is called test) from the Project menu, then select Toolchain, and under AVR/GNU C Compiler select Symbols
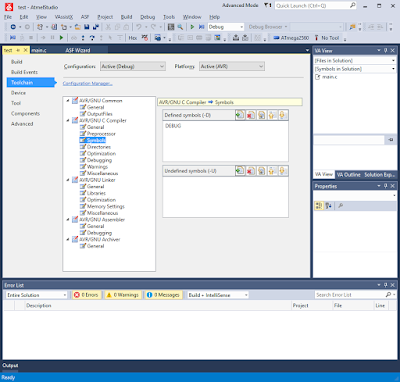
Atmel Studio 7 - Project Properties tab - in the Defined Symbols (-D) box, click the Add Item button and enter F_CPU=16000000UL (this specifies the processor clock frequency in Hertz; for the Arduino Mega 2560 this is 16MHz - the "UL" suffix means Unsigned Long)

Atmel Studio 7 - adding a defined symbol - select the main.c tab and enter enough C code to see life signs - mine pulses the "L" LED once then twice, over and over

Atmel Studio 7 - entering a simple C test program
#include <avr/io.h>
#include <util/delay.h>

int main(void)
{
 DDRB |= (1 << PORTB7); // PORTB7 direction = out

 while (1)
 {

  // 1 pulse
  PORTB |= (1 << PORTB7); // PORTB7 hi = LED L on
  _delay_ms(500); // 0.5 sec
  PORTB &= ~(1 << PORTB7); // PORTB7 hi = LED L off

  // delay
  _delay_ms(2000); // 2 sec

  // 2 pulses
  PORTB |= (1 << PORTB7);
  _delay_ms(500);
  PORTB &= ~(1 << PORTB7);
  _delay_ms(500);
  PORTB |= (1 << PORTB7);
  _delay_ms(500);
  PORTB &= ~(1 << PORTB7);

  // delay
  _delay_ms(2000);
 }
}
- now the interesting part - adding support for the Arduino's programming mechanism, which requires the use of the avrdude utility that is included in the Arduino software installation
- first, identify the COM port that the Arduino is connected to by running the Device Manger - in my case it was COM3...

Device Manager (Windows 10) showing Arduino COM port - choose External Tools... from the Tools menu
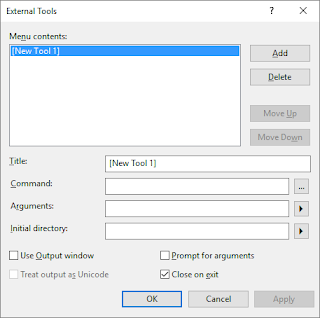
Atmel Studio 7 - External Tools dialog (before) - in the External Tools dialog...
- change the Title to Program
- enter the following in the Command box:
c:\Program Files (x86)\Arduino\hardware\tools\avr\bin\avrdude.exe - enter the following in the Arguments box, changing -P COM3 to match the COM port that the Arduino is connected to on your machine:
-v -C"C:\Program Files (x86)\Arduino\hardware\tools\avr\etc\avrdude.conf" -p atmega2560 -c wiring -P COM3 -b 115200 -D -U flash:w:$(TargetDir)$(TargetName).hex:i - check the Use Output window box
- click OK

Atmel Studio 7 - External Tools dialog (after) - there is now a Program option on the Tools menu which will flash the compiled code into the Arduino board - let's add a corresponding shortcut to the UI:
- under Categories select Tools
- under Commands scroll down and select External Command 1
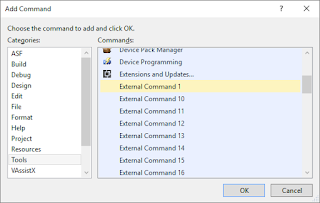
Atmel Studio 7 - Add Command dialog - click OK then Close the Customize dialog
- there is now a Program button left of the device (ATmega2560) button
- to build the code, choose Build Solution from the Build menu (or hit F7):

Atmel Studio 7 - after build - now program the board by clicking the Program button - this will produce some rapid progress messages from the avrdude programming utility in the Output pane:

Atmel Studio 7 - after programming - voila - you should see the "L" LED blinking once then twice, repeatedly


This comment has been removed by the author.
ReplyDeleteATmelHelpPlease, here, re-posting my removed comment:
ReplyDeleteThe Atmel Studio Version I was using (7.0.790) did not show the "External Tools" selection from the "Tools" menu. With help from Adam, he indicated that "Tools/Select Profile" selection of my loaded program was probably set to "Standard"; it was indeed. By selecting "Advanced" instead the "External Tools" menu option was visible and I was able to proceed with the Tutorial. And it worked! Just be sure to change the command statement to fit your com port, MCU, path and filename.
Many Thanks to Adam Barnes for posting this tutorial. This was a big help.
Note that for an Arduino Mega (based on the ATmega1280) a different recipe for arguments is needed, changing the device type from "atmega2560" to "atmega1280" (obviously), the baud rate from 115200 to 57600, and the programmer type from "wiring" to "arduino":
ReplyDelete-v -C"C:\Program Files (x86)\Arduino\hardware\tools\avr\etc\avrdude.conf" -p atmega1280 -c arduino -P COM3 -b 57600 -D -U flash:w:$(TargetDir)$(TargetName).hex:i
Hi Adam,
ReplyDeletethx so much for this tutorial :)
I owe you a favor
Hi Adam,
ReplyDeleteThanks for this, I need to buy you a pint
nice tutorial, thanks
ReplyDeleteexcellent tutorial, thanks!
ReplyDeleteThank you. Usually dev tools takes a weekend to figure out, your tutorial took me a few hours(tool download/install included).
ReplyDelete5 stars!